[Update: I have moved my blog to https://medium.com/sausheong – please visit my new blog, thanks!]
Years ago when I was just starting out in my career, a couple of friends and I came together with a new startup idea. The plan was to take a few days off from work, get a hotel room somewhere (co-working spaces were almost non-existent then) and start hacking out our new exciting prototype. However, we were a bit stuck because of our computers.
I had just started my job a couple of years then, and only had a self-assembled full tower computer at home but nothing portable. My better-funded friend had a laptop and said he could borrow another from someone else for me, while the other friend said he has his own portable computer.
We went about doing our own planning, and when the day came, we were pretty dumbfounded by my friend’s ‘portable computer’. I didn’t manage to take a picture — no one have a casual habit of carrying cameras then and anyone wanting to take a picture with his phone would be considered a raving lunatic (how do you stick a roll of film into a phone)?
His ‘portable computer’ was his mid-tower machine in a red supermarket shopping plastic bag, stuffed along with his mouse, full sized keyboard and power cables. His plan, as he explained after we picked our jaws off the floor, was to connect it to the TV in the hotel room.
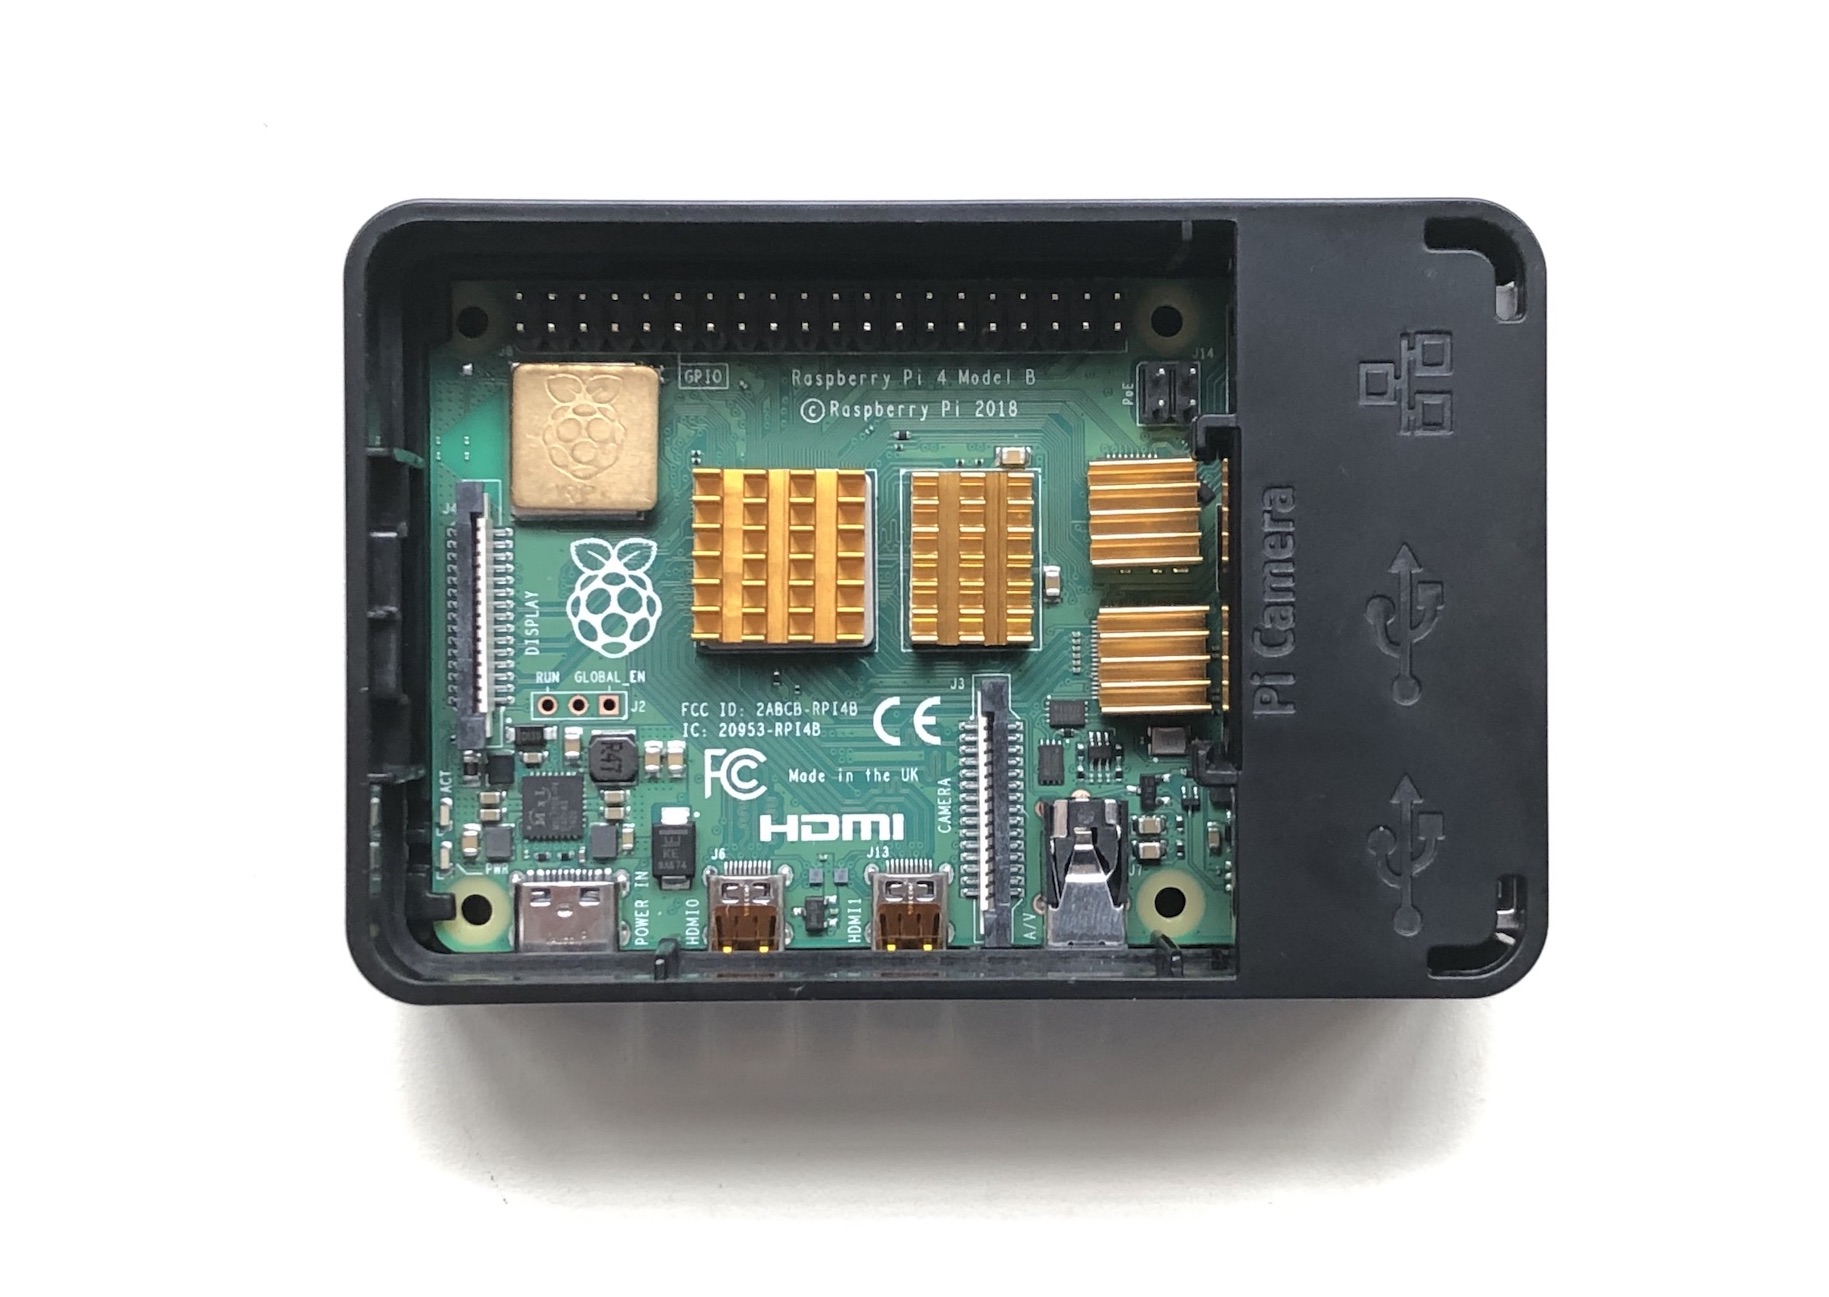 My Raspberry Pi 4 dev machine
Portable computers have come a long way since then.
Tools of the trade
I develop mostly using Go but I also occasionally still do some Python (for data science stuff) and Ruby (something quick or working on my older projects). While most of my work focused on the web, I do occasionally do lower-level development. This generally means I need to access the machine itself and have the ability to install libraries and packages that I need, access to console and a good text editor or IDE.
My main development machine is a MacBook Pro, which combination of power and portability is the best fit for me. Portability is important for me because I move around quite a bit and frankly I want to develop whenever and wherever I want to. I already use the iPad Pro quite extensively for many things including reading, surfing, emailing and chatting. Question is, can I also do software development on it?
Developing on the iPadOS is tough hill to climb because it’s a walled garden. While there are some ways to run Python, Ruby and even Java on the iPadOS now but there are significant limitations. That leaves us with developing software on the iPad Pro but as a conduit to another machine elsewhere.
Technically speaking I can develop everything over the web by spinning up servers or virtual desktops on the cloud. Realistically though, it’s too slow, even if your cloud server is within the same country and your country is pretty small. Also, if you’re offline (maybe on a plane or in a remote location without Internet access) you’re pretty much stuck if your development machine is on the cloud.
When all fails, DIY
The idea for an offline Raspberry Pi development machine instead of going to the cloud is not new, neither with me nor with many who caught the Pi fever. The idea is instead of spinning up a new server on the cloud to fulfil your needs, just connect it to a Raspberry Pi. The Pi is cheap enough and runs Linux and you can stick it into your bag and bring it along with you everywhere.
There were generally two problems. One is how to power the Pi since it doesn’t have a built-in battery. Of course you can power it externally connecting to a wall socket and a power adapter but reduces its portability and you need wall sockets for it to work. Alternatively, you can also connect it to a mobile power bank. Depending on the rating on the power bank, it could run comfortably for a few hours, but of course, this also means you need to lug a power bank along with you.
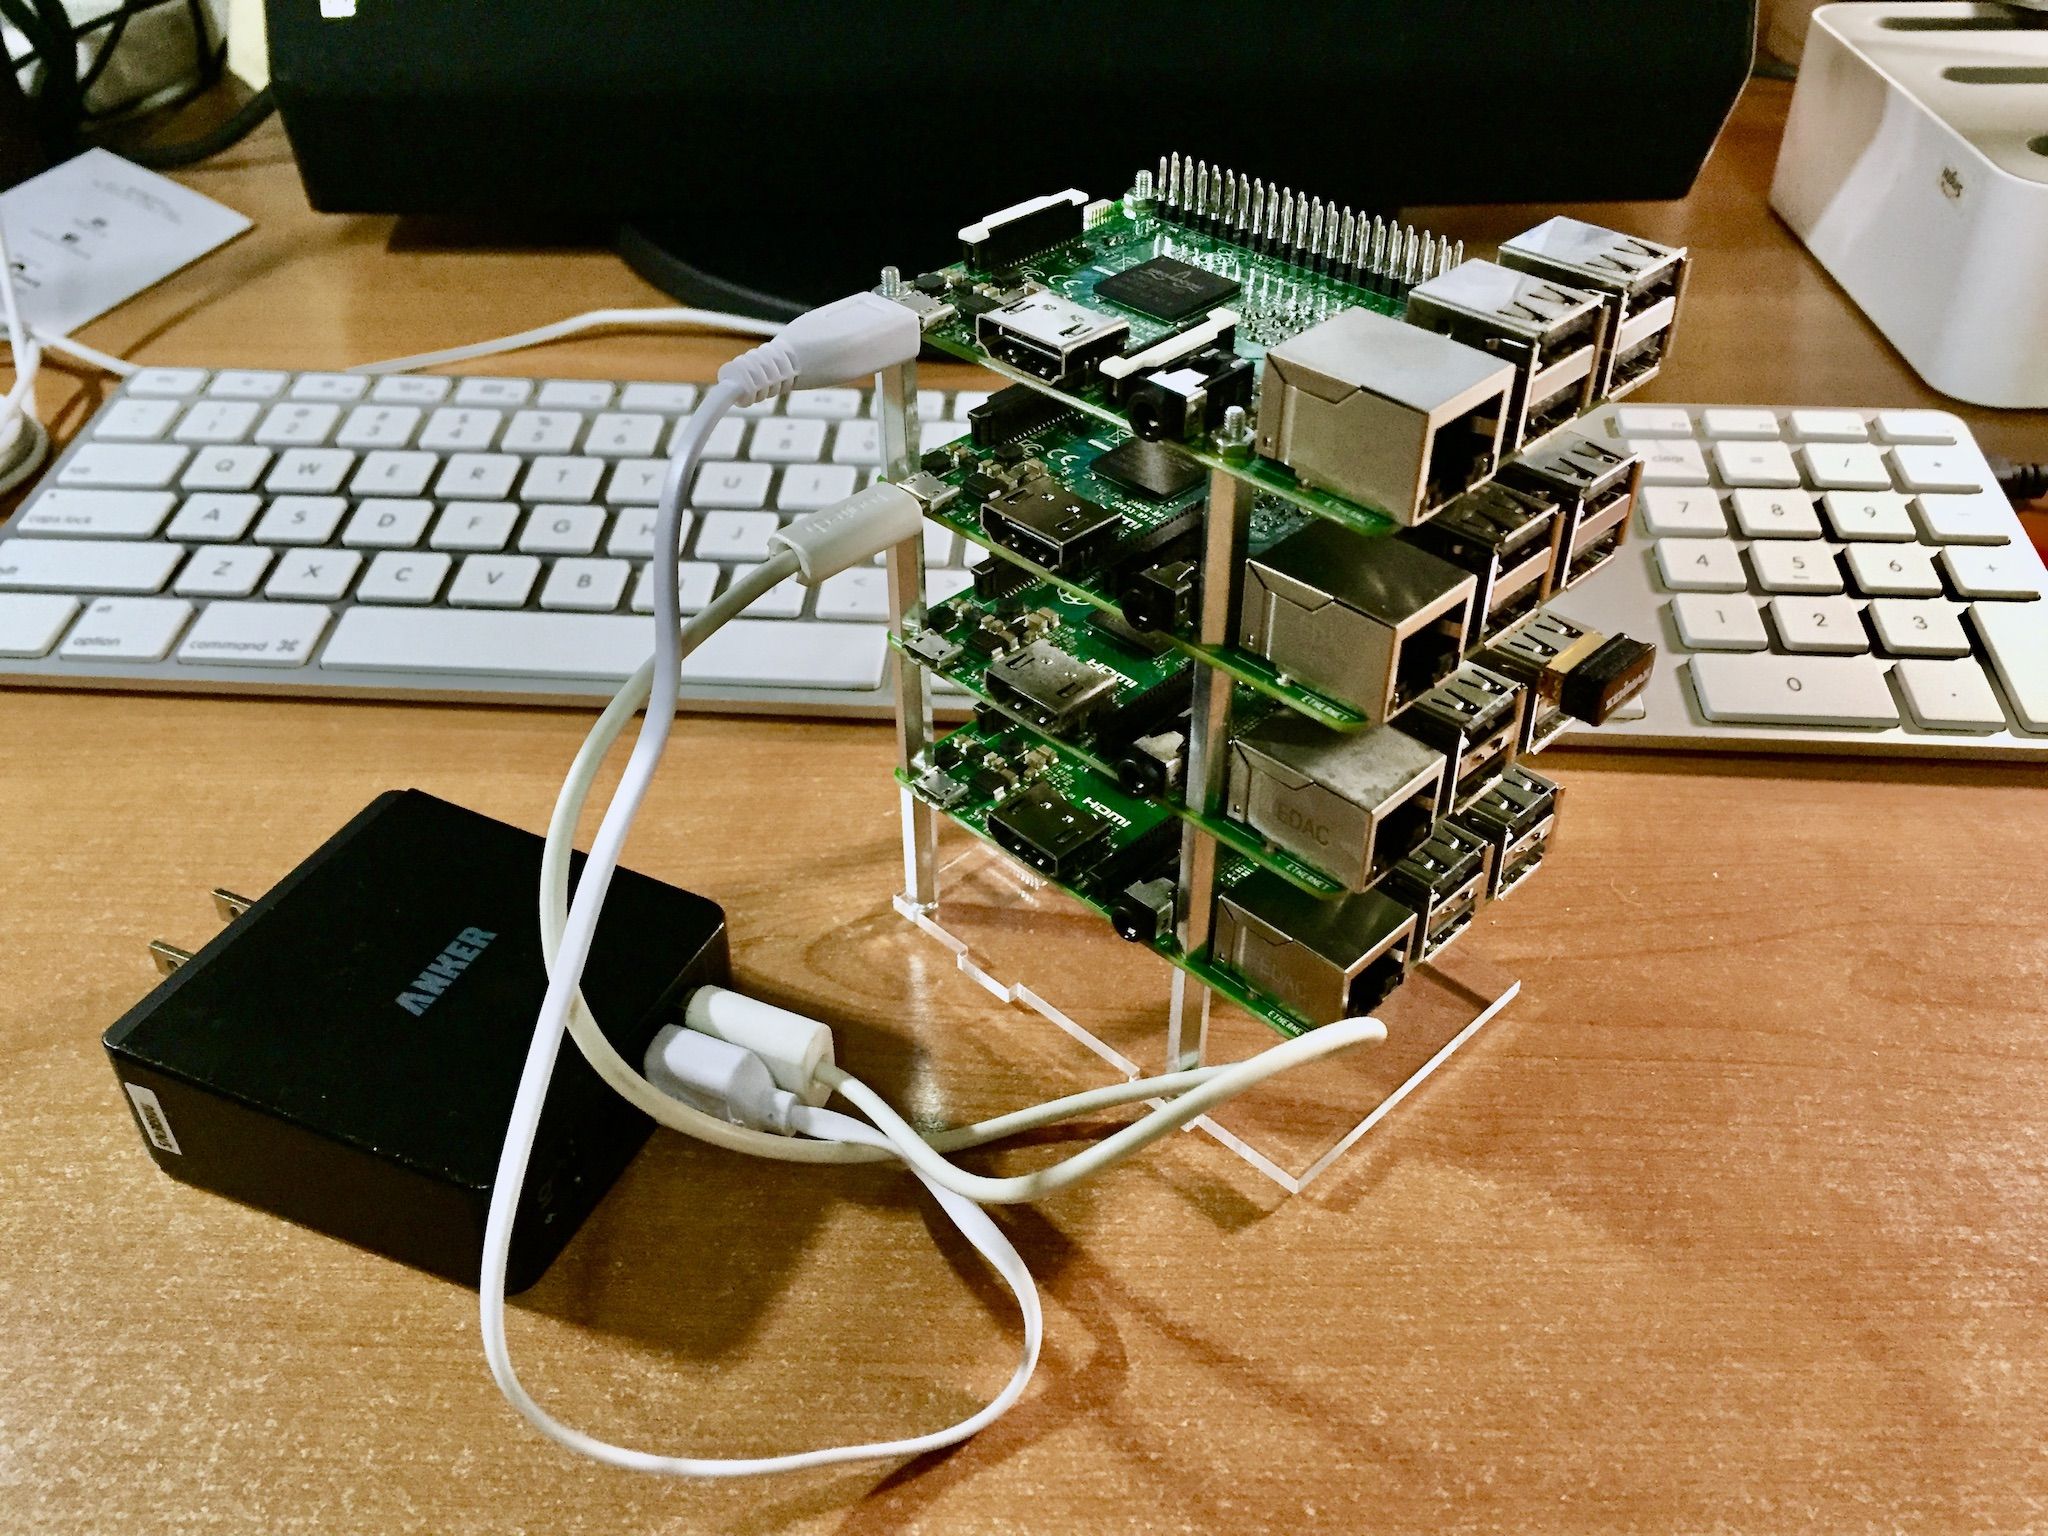 An older cluster of Pi3
The second problem is how to make the data connection to the Pi. There are two ways of doing it, the first is to use the built-in ethernet port. Simply, use an ethernet cable and connect it to your iPad Pro. However, this means you need an adapter or hub that has an ethernet port that will connect to your iPad Pro, making the whole thing a bit unwieldy (especially if you add in the power cables).
The other option is to use wifi. The Pi has built-in wifi. We make the iPad Pro a hotspot, and then connect the Pi to the hotspot. This causes some issues though — because you now make the iPad Pro a hotspot, it can no longer use its wifi, you can only use the cellular data connection. But it works. Unfortunately there are speed issues and you’re not much better off than just spinning a server on the cloud with it.
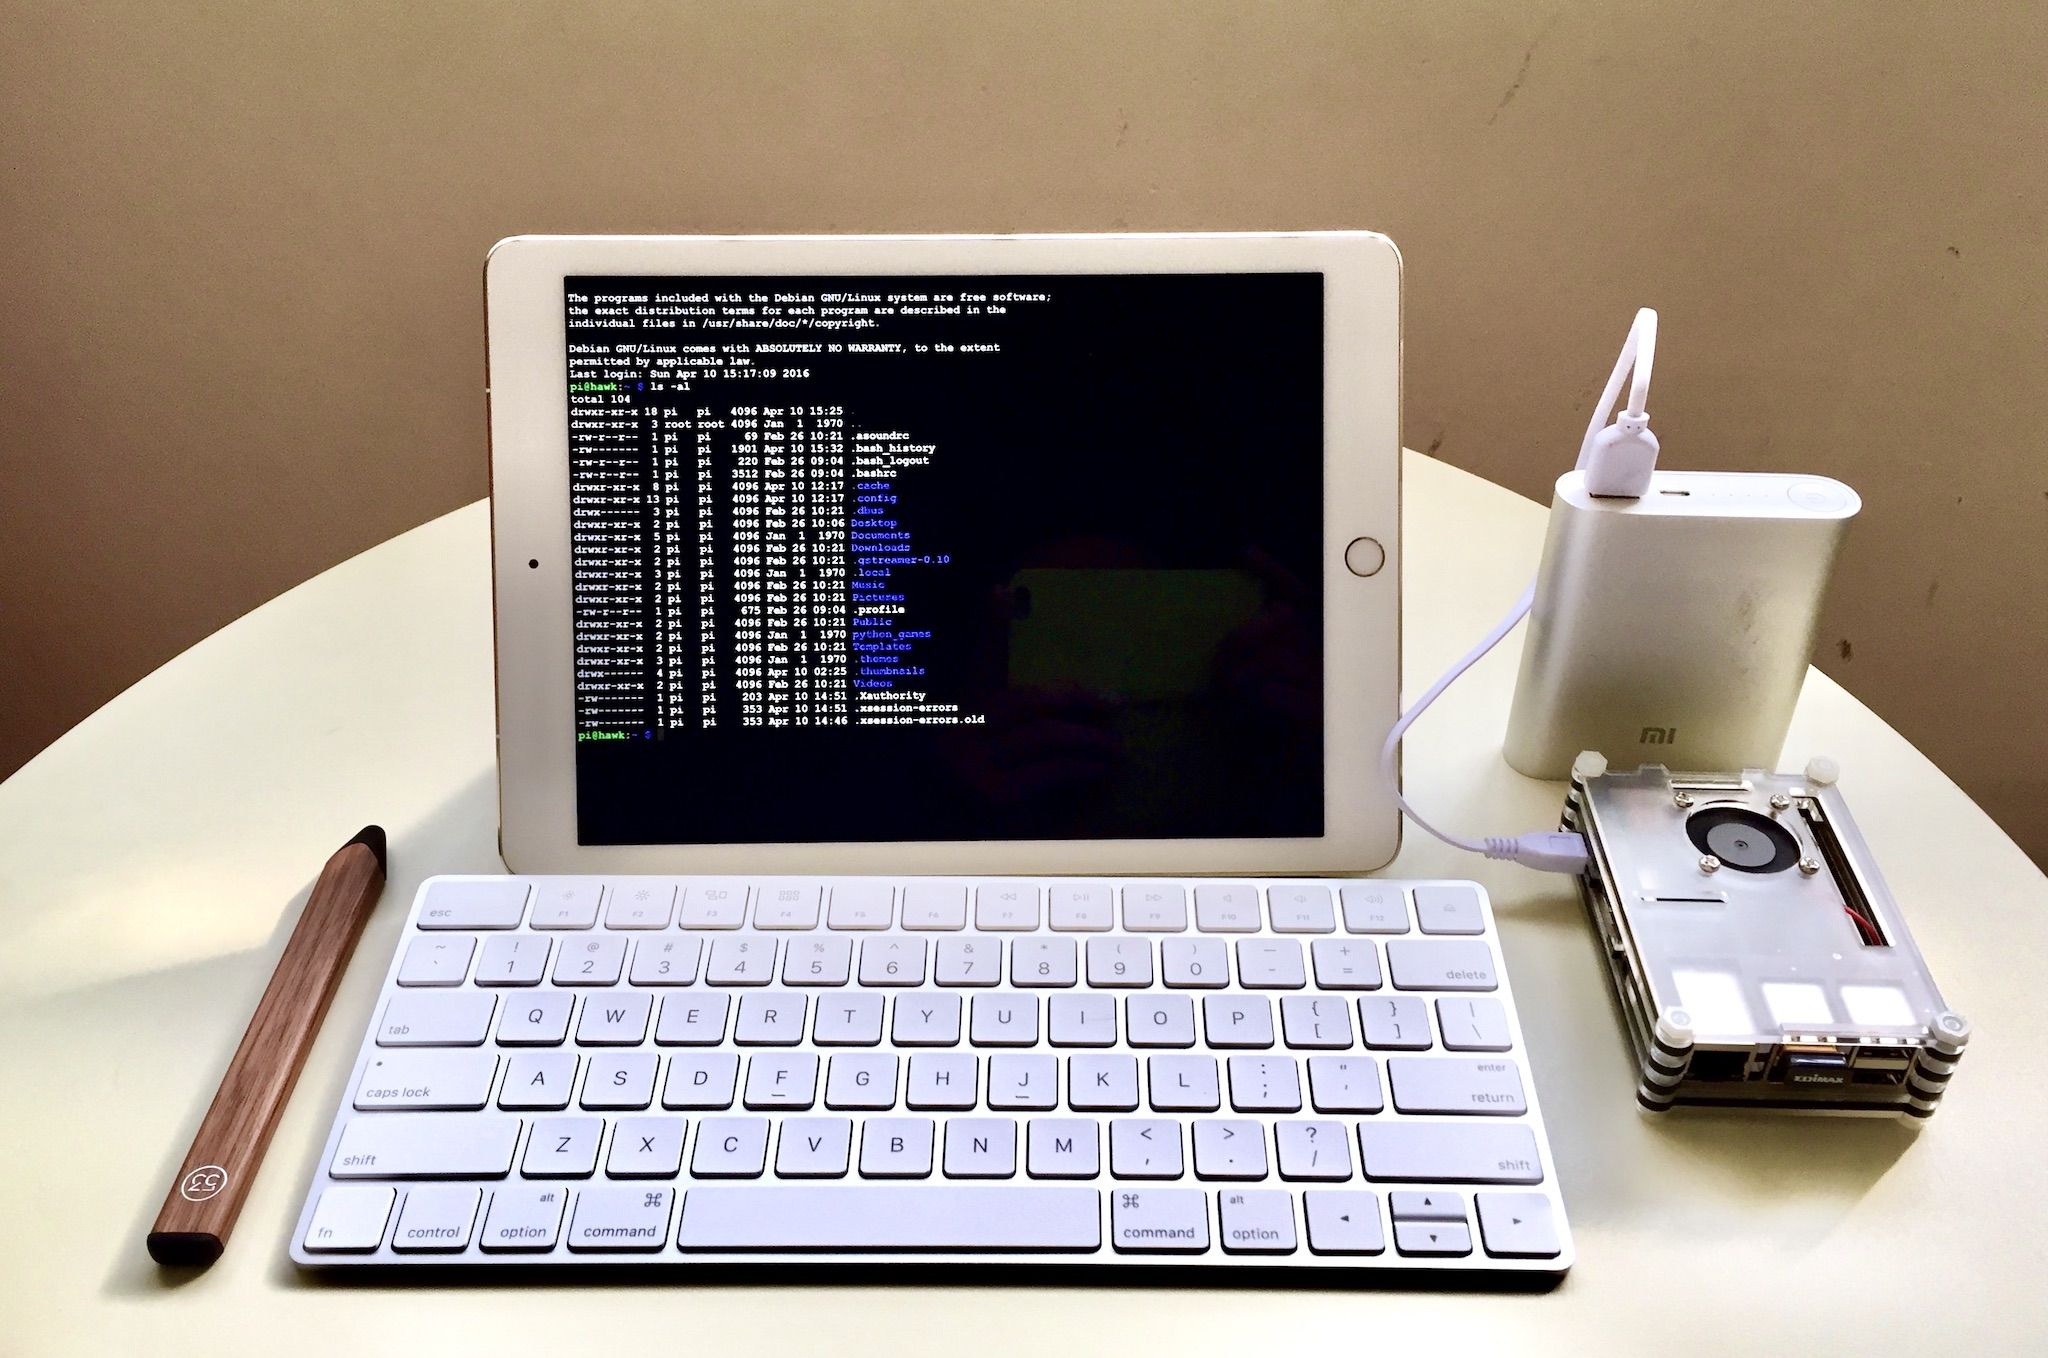 My previous Pi3 setup
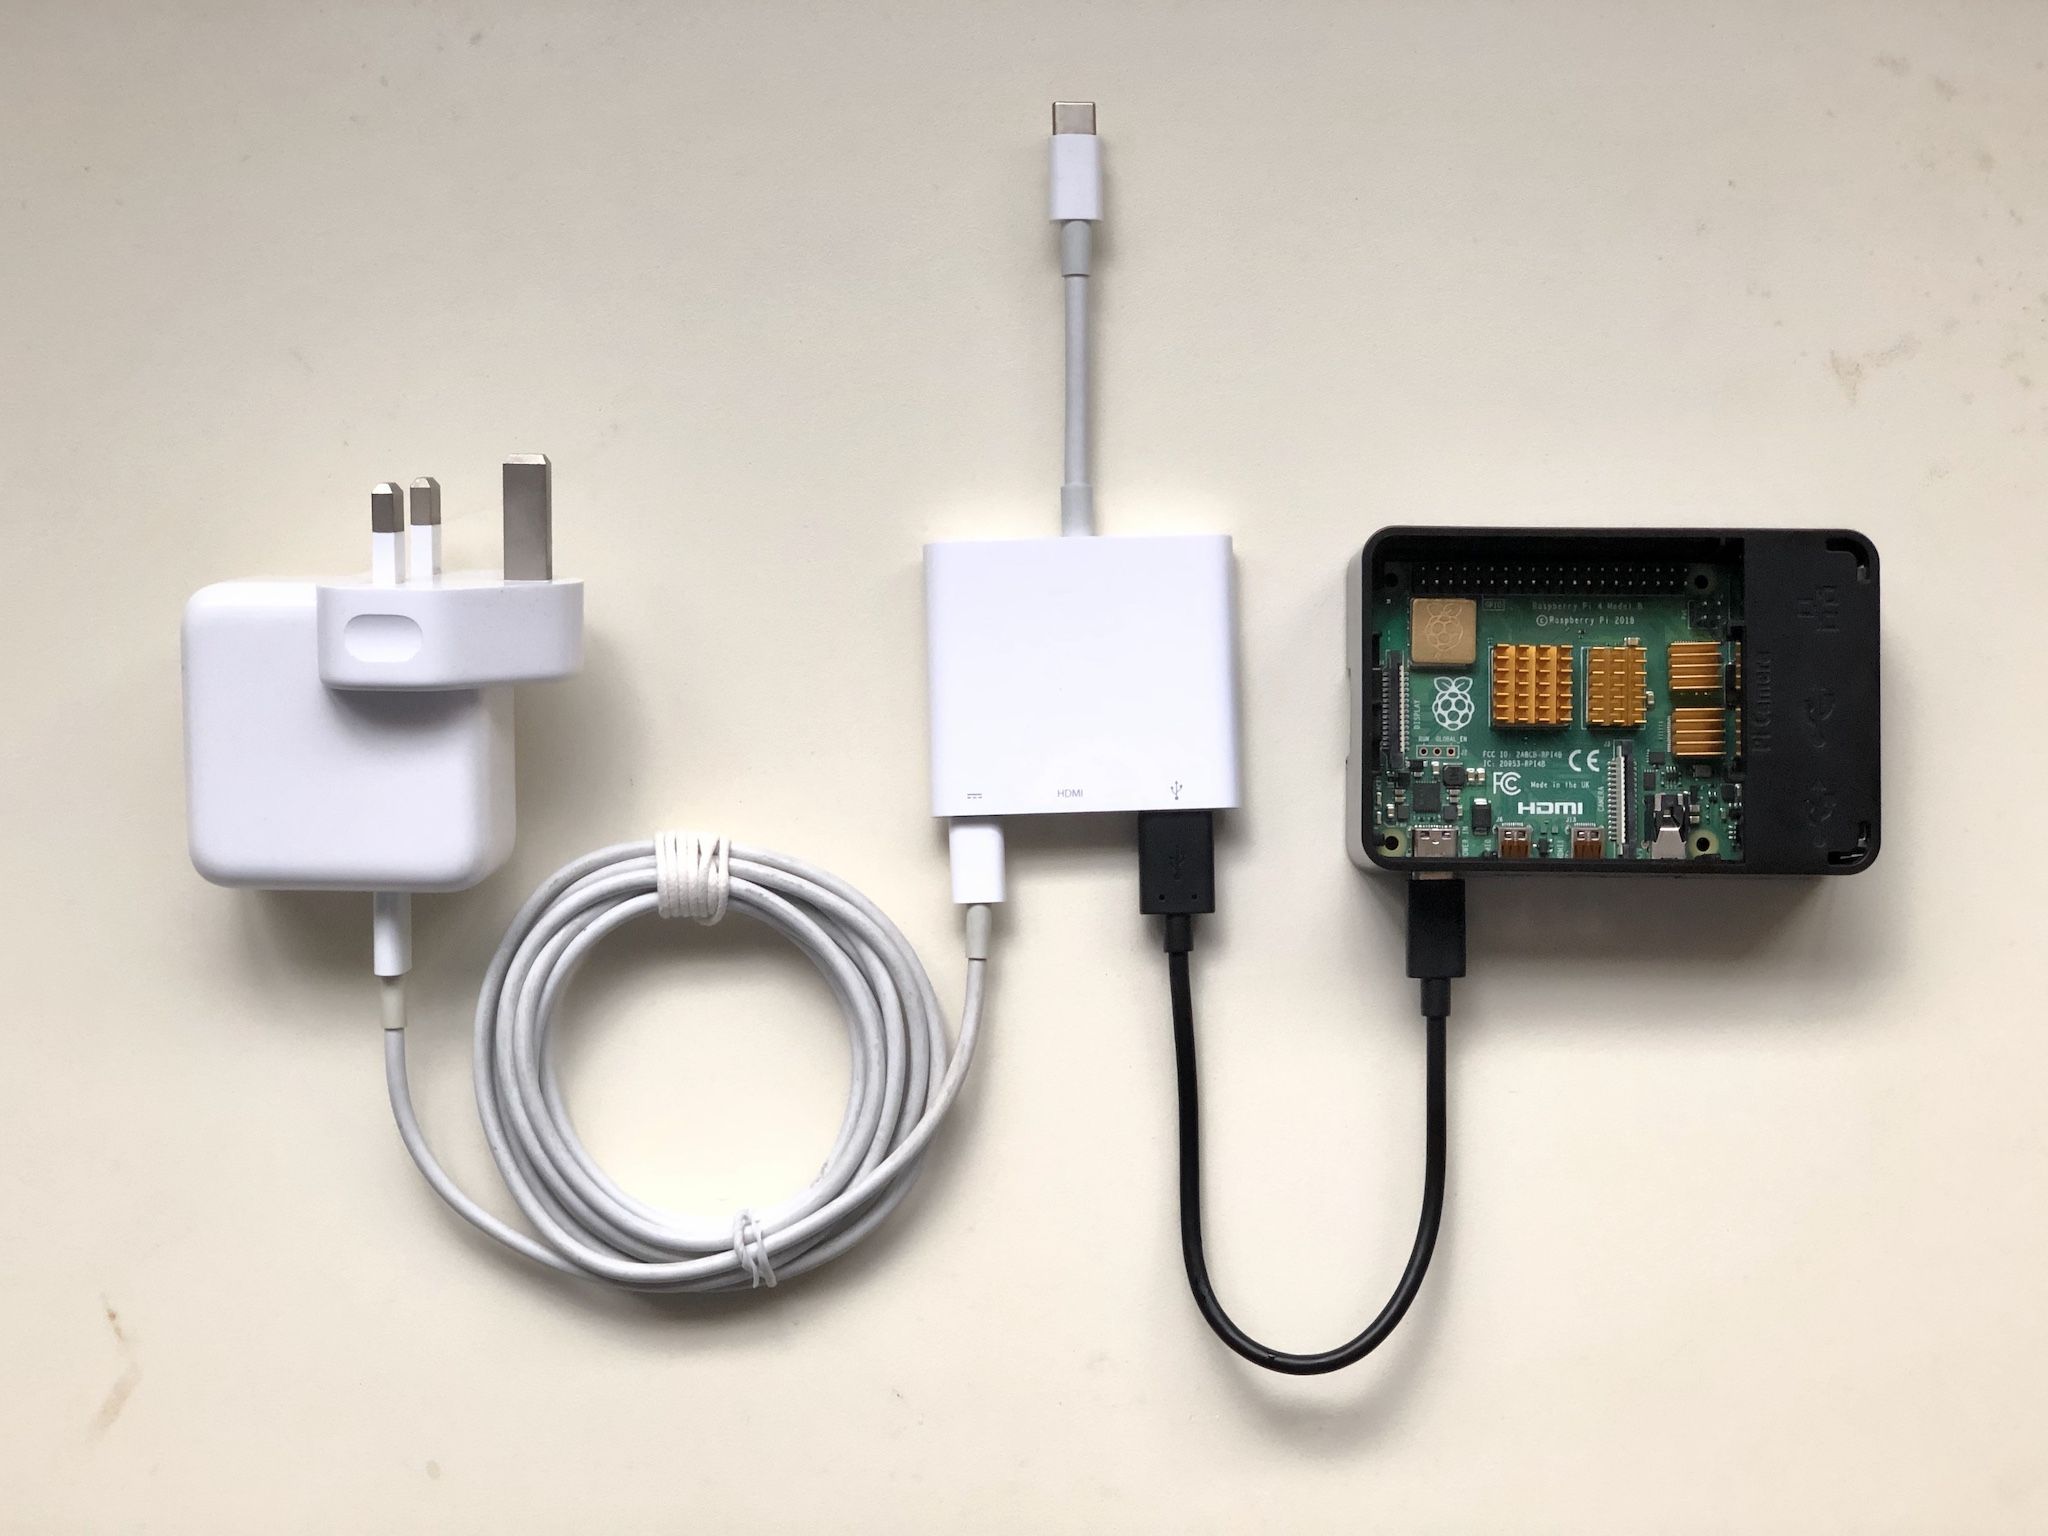
There’s another middle-ground way though, and one that appears pretty elegantly with the Raspberry Pi 4 Model B. The Pi4 has few interesting hardware changes (which I won’t elaborate, you can find out easily from the Internet elsewhere) but what is pretty helpful for our cause is the fact that the Pi4 has a USB-C port, which you can power it with, but also use it to transfer data.
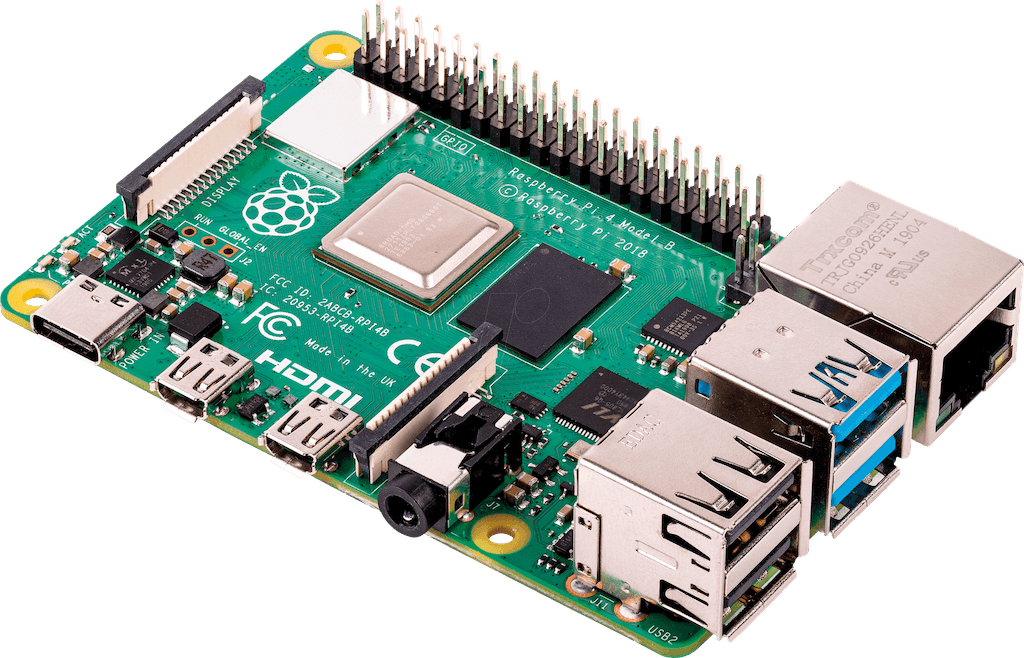 Raspberry Pi 4 Model B
You can see where this is going. By sticking a USB-C cable from iPad Pro to the Pi4 we solve both the power and data connectivity issues with a single cable!
How to make your Pi4 a gadget
To repeat — if we connect the iPad Pro (the one with the USB-C port) to the USB-C port of the Pi4, we can power the Pi4 directly from the iPad Pro. At the same time, the cable also act as the data conduit — we just need to convince the Pi4 to consider the USB-C port as an ethernet port.
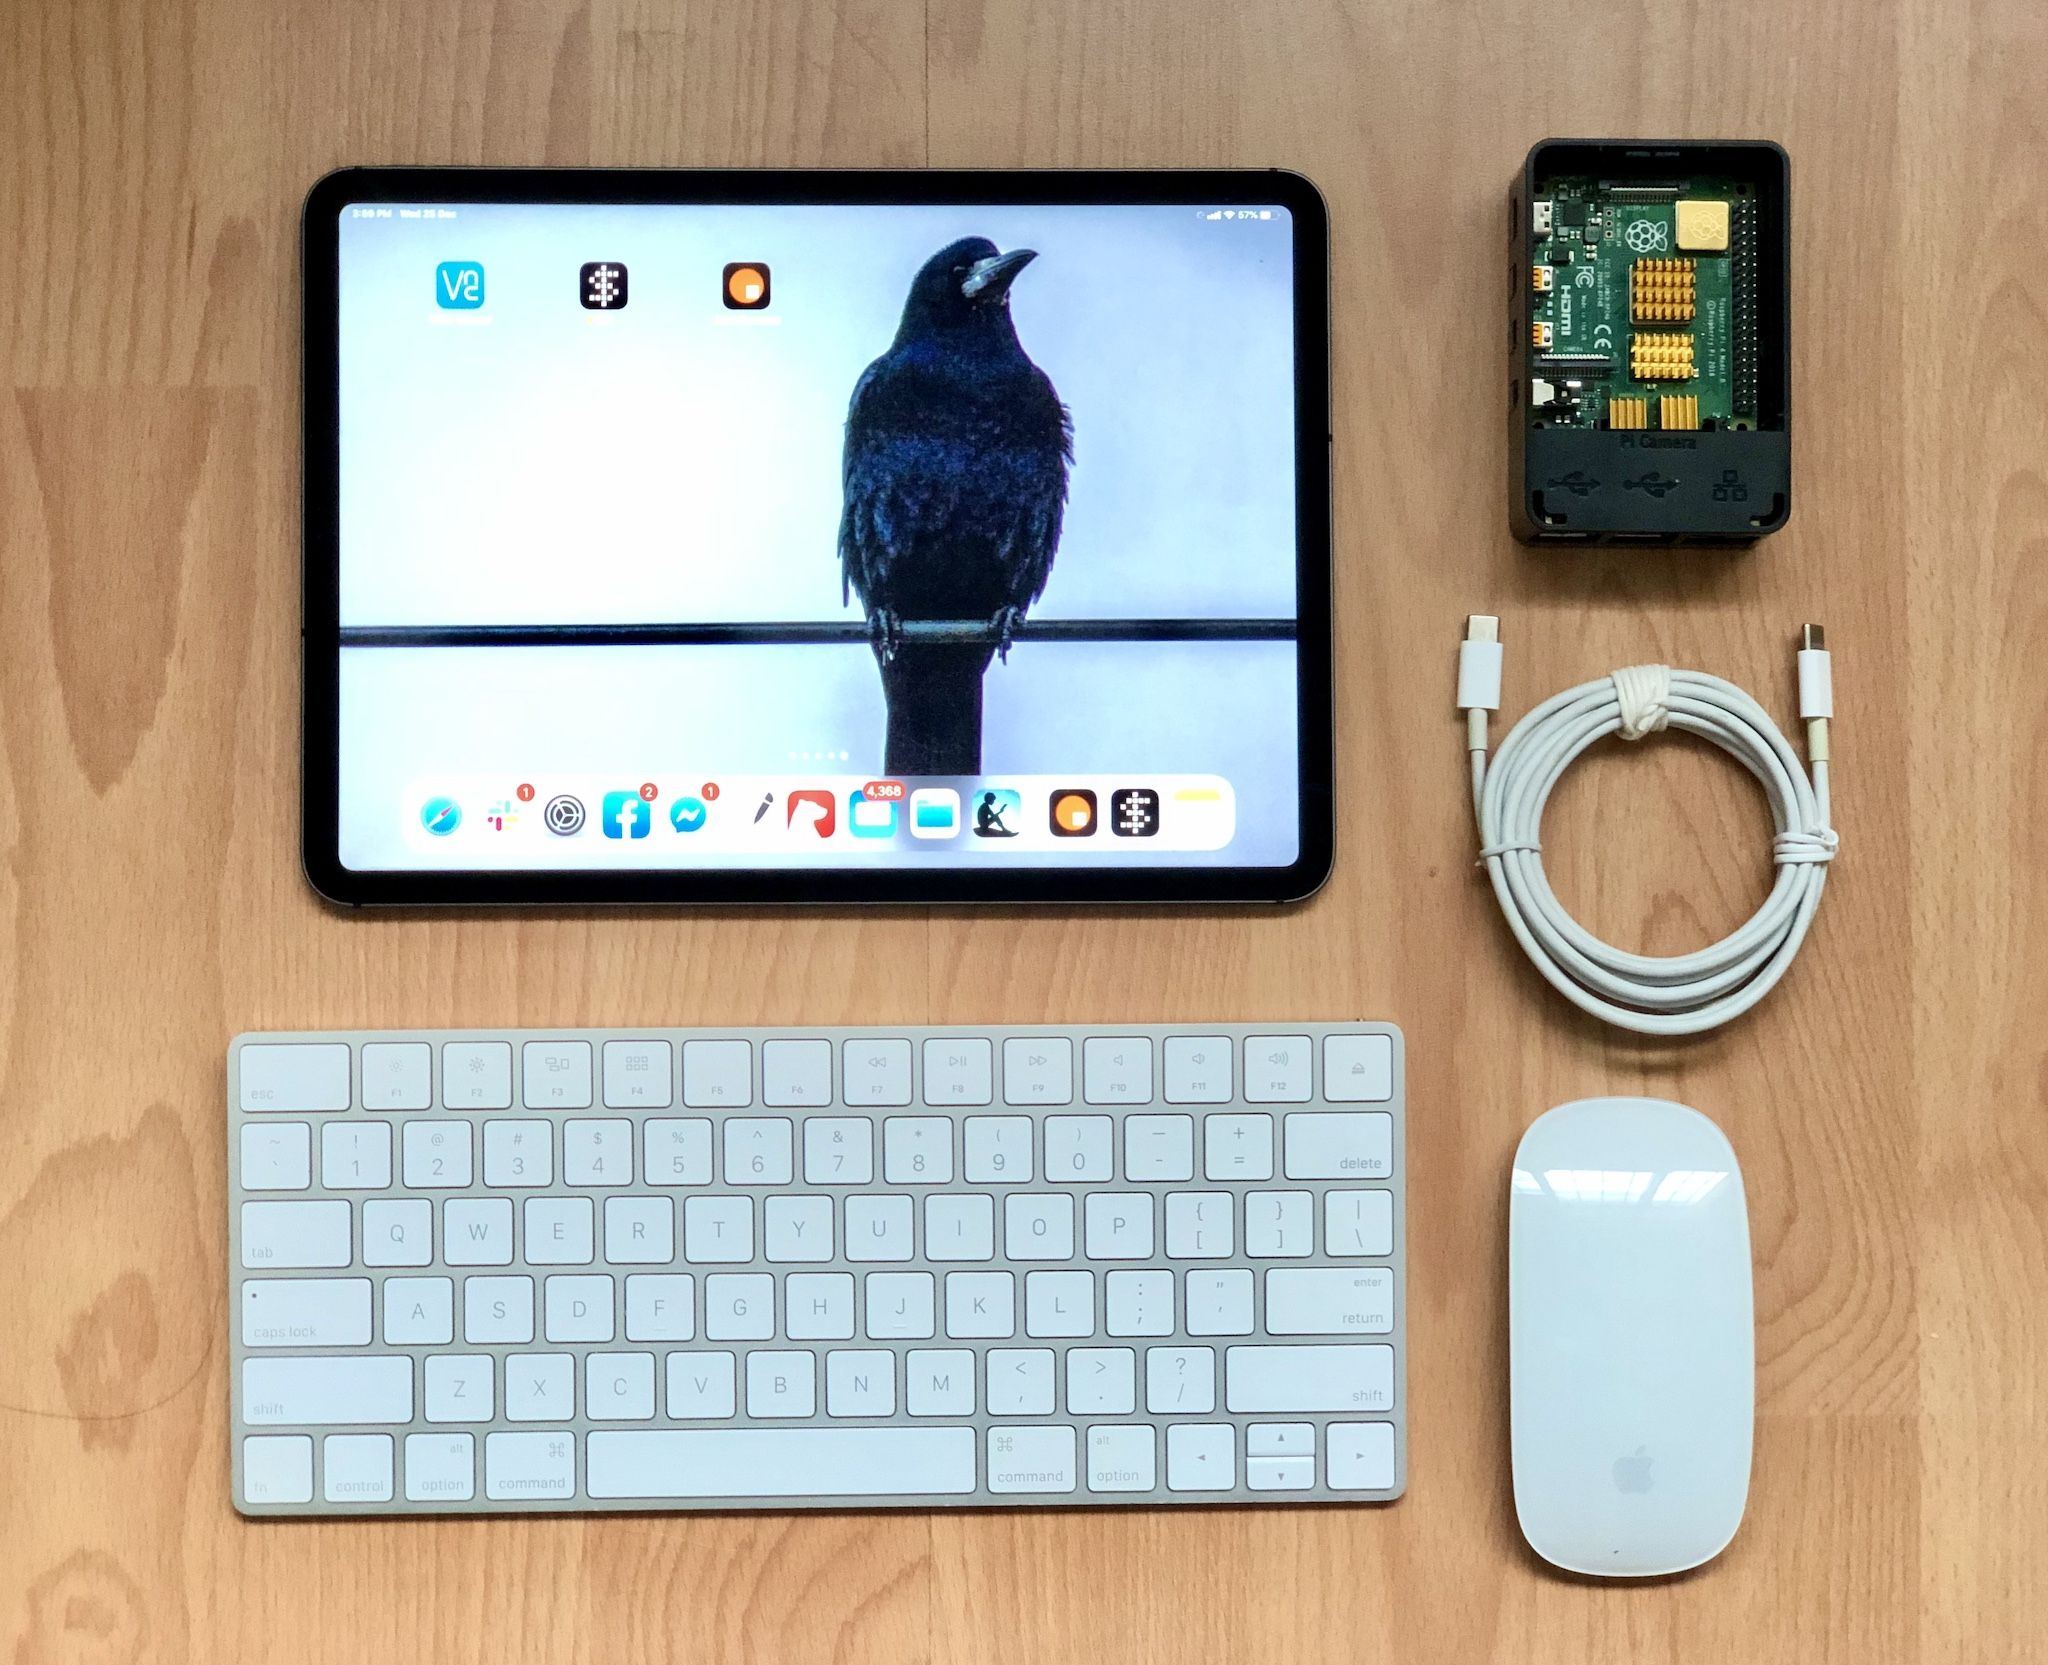
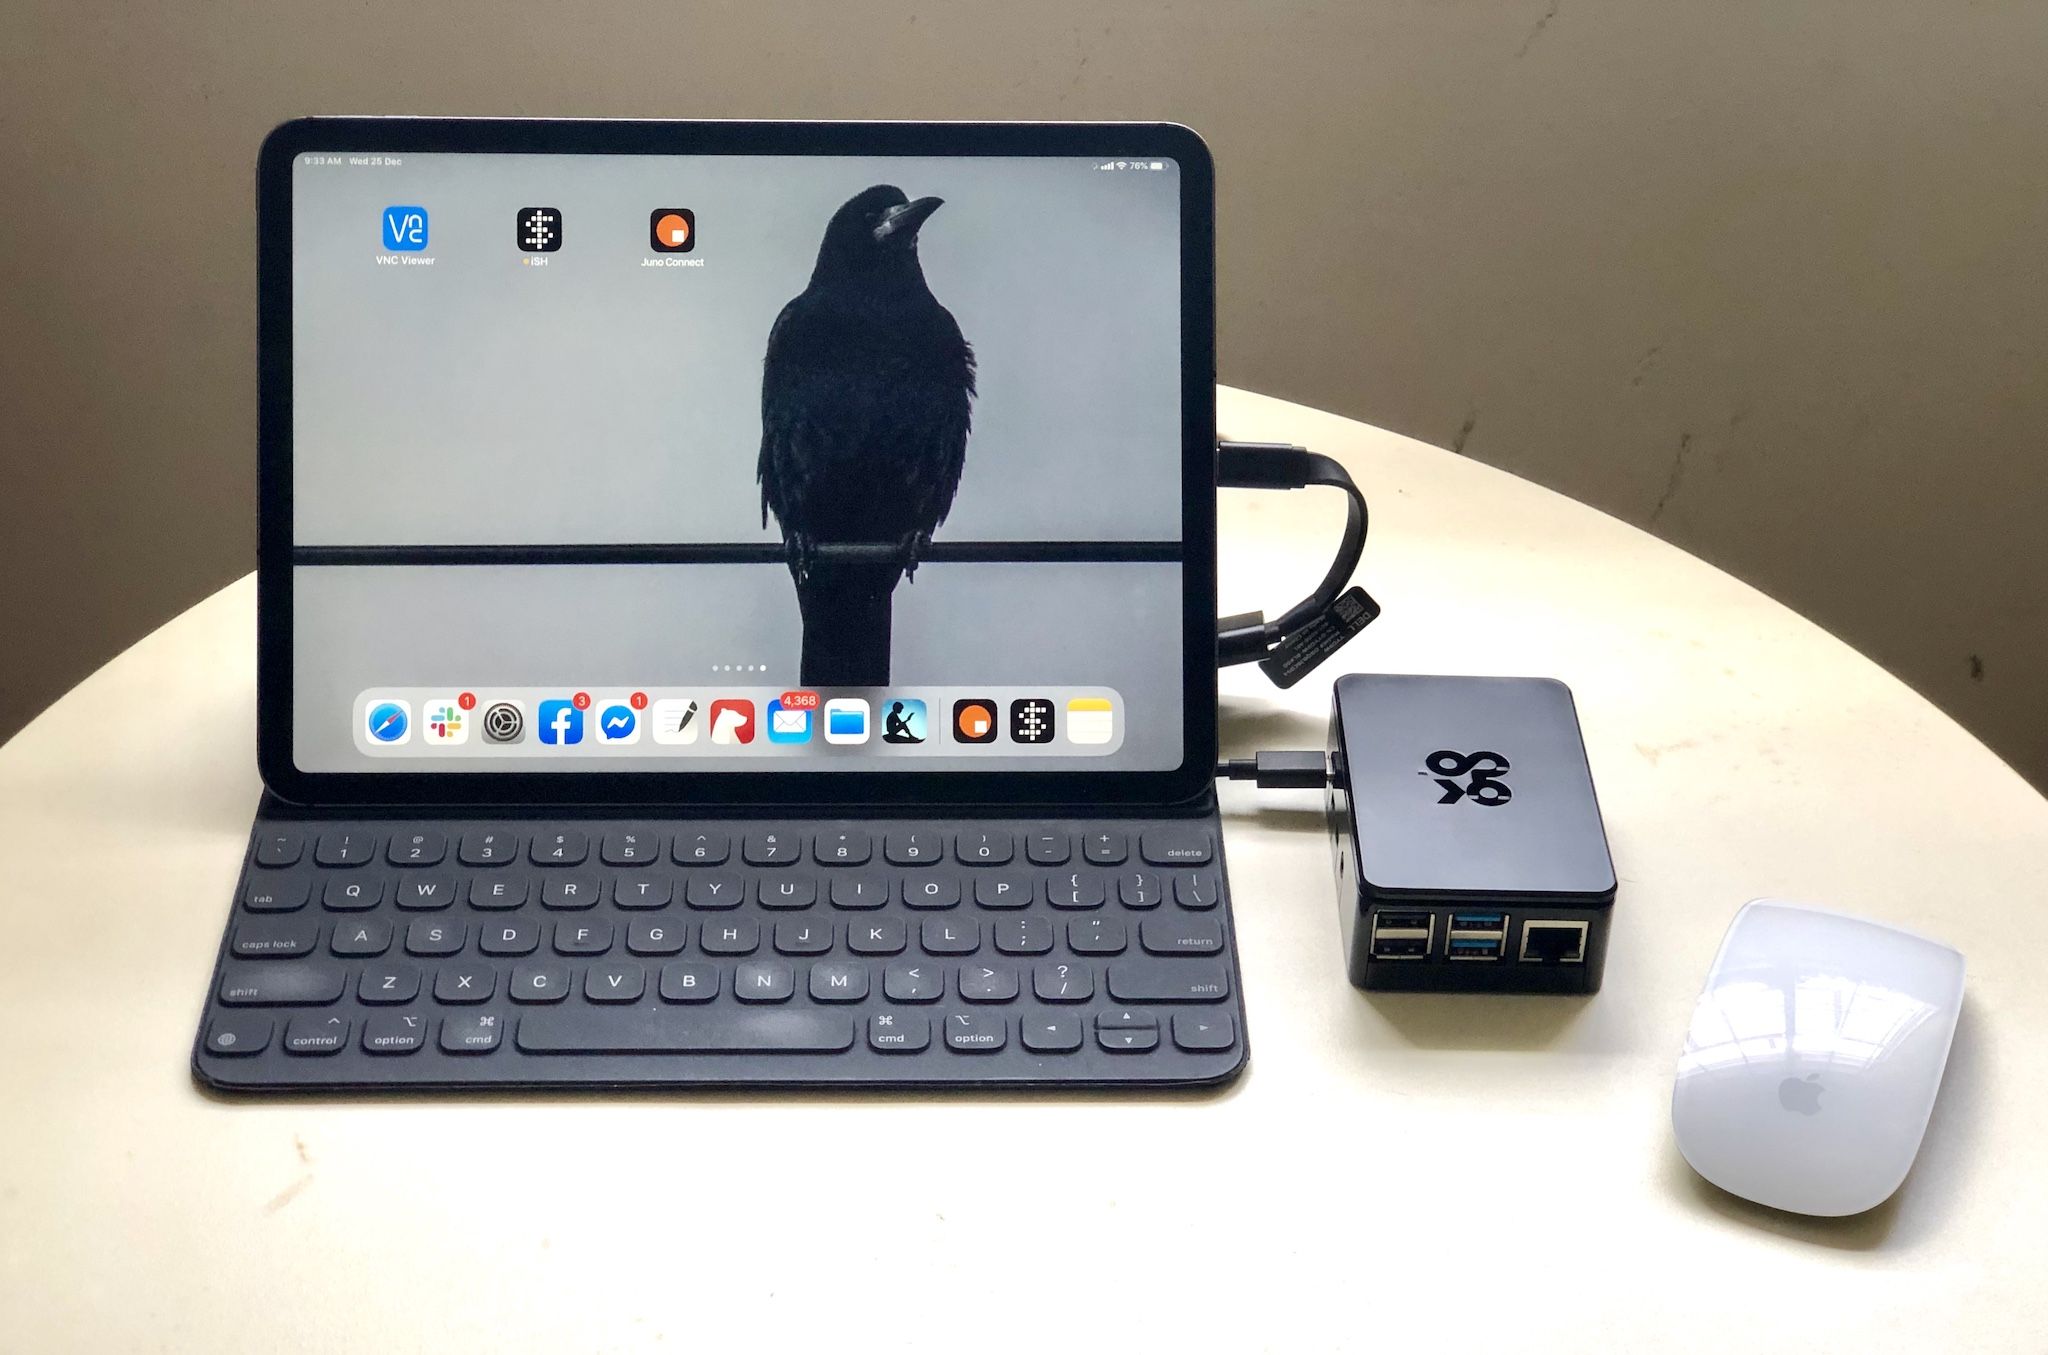 My latest Pi4 setup
The way we do it is to set up the Pi4 as a USB ethernet gadget.
USB gadgets
Before we start, let’s understand a bit what a USB gadget is.
A USB Linux gadget is a device that has a UDC (USB Device Controller) and can be connected to a USB host (like a computer or an iPad Pro) to extend it with additional functionalities. A gadget is defined by a set of configurations, each of which contains one or more functions. In our case, what we’re doing is setting up the Pi4 as a USB Linux gadget with the ethernet over USB function.
Note that this method works well for the Pi4 Model B and Pi Zero (and also Raspberry Pi 3 A+) but not for other Raspberry Pi models because the hardware itself doesn’t support data transfer the same way.
Make your Pi4 into an ethernet gadget
Let’s get started.
I use Raspbian (Buster is the current version as I was setting this up) because I’m more familiar with Debian — you can try other distros you prefer.
First, we need to set up the Pi4 as the gadget using the dwc2 driver in device tree overlay, then load it up.
- Add
dtoverlay=dwc2to the/boot/config.txt - Add
modules-load=dwc2to the end of/boot/cmdline.txt
Next, we need to enable the libcomposite driver. You might see some tutorials using the g_* series of drivers (eg g_ether) but for these you can only load one at a time whereas libcomposite allows you to load up whichever is needed through configuration, so libcomposite is the better choice (in my opinion).
The next step is where we configure our gadget. To do this we set up a script to run when booting up. In this script we will do the following:
#!/bin/bash

# create a directory to represent the gadget
cd /sys/kernel/config/usb_gadget/ # must be in this dir
mkdir -p pi4
cd pi4

# the USB vendor and product IDs are issued by the USB-IF
# each USB gadget must be identified by a vendor and
# product ID
echo 0x1d6b > idVendor # Linux Foundation
echo 0x0104 > idProduct # Multifunction Composite Gadget

mkdir -p strings/0x409 # set it up as English
# The configuration below is arbitrary
echo "1234567890abcdef" > strings/0x409/serialnumber
echo "Chang Sau Sheong" > strings/0x409/manufacturer
echo "Pi4 USB Desktop" > strings/0x409/product

# create a configuration
mkdir -p configs/c.1
# create a function
# ECM is the function name, and usb0 is arbitrary string
# that represents the instance name
mkdir -p functions/ecm.usb0

# associate function to configuration
ln -s functions/ecm.usb0 configs/c.1/

# bind the gadget to UDC
ls /sys/class/udc > UDC

# start up usb0
ifup usb0
# start dnsmasq
service dnsmasq restart
After this make sure the script is executable and set it up to run when the Pi4 is started.
Set up the networking for usb0
Your Pi4 is now configured as an ethernet gadget with the interface usb0 but we still need to make sure the rest of the networking configurations are set up properly.
Dnsmasq is an open source project that provides network infrastructure for small networks and we’ll use it for the really small network between the iPad Pro and the Pi4. It includes DNS, DHCP, router advertisement and network boot and is widely used for tethering on smartphones and portable hotspots.
Once you have installed dnsmasq, we need to set up it up properly for usb0.
interface=usb0
dhcp-range=192.168.100.2,192.168.100.200,255.255.255.248,1h
dhcp-option=3
leasefile-ro
Now that we have dnsmasq we don’t need the standard DHCP client to muck around with usb0.
The final step is to set up the network interface for usb0.
auto usb0
allow-hotplug usb0
iface usb0 inet static
  address 192.168.100.1
  netmask 255.255.255.248
Restart the Pi4
If you’ve done all the steps above, that’s it!
You just need to restart the Pi4, attach it to your iPad Pro and you should see a new Ethernet row under Settings coming up in a short while. This means the Pi4 is connected to the iPad Pro through an ethernet connection.
 If you see the Ethernet setting it means the Pi4 is connected
If you select the Pi4 USB Desktop setting you should see something like this. The IP address and subnet mask is assigned by dnsmasq and represents the IP address of the iPad Pro.
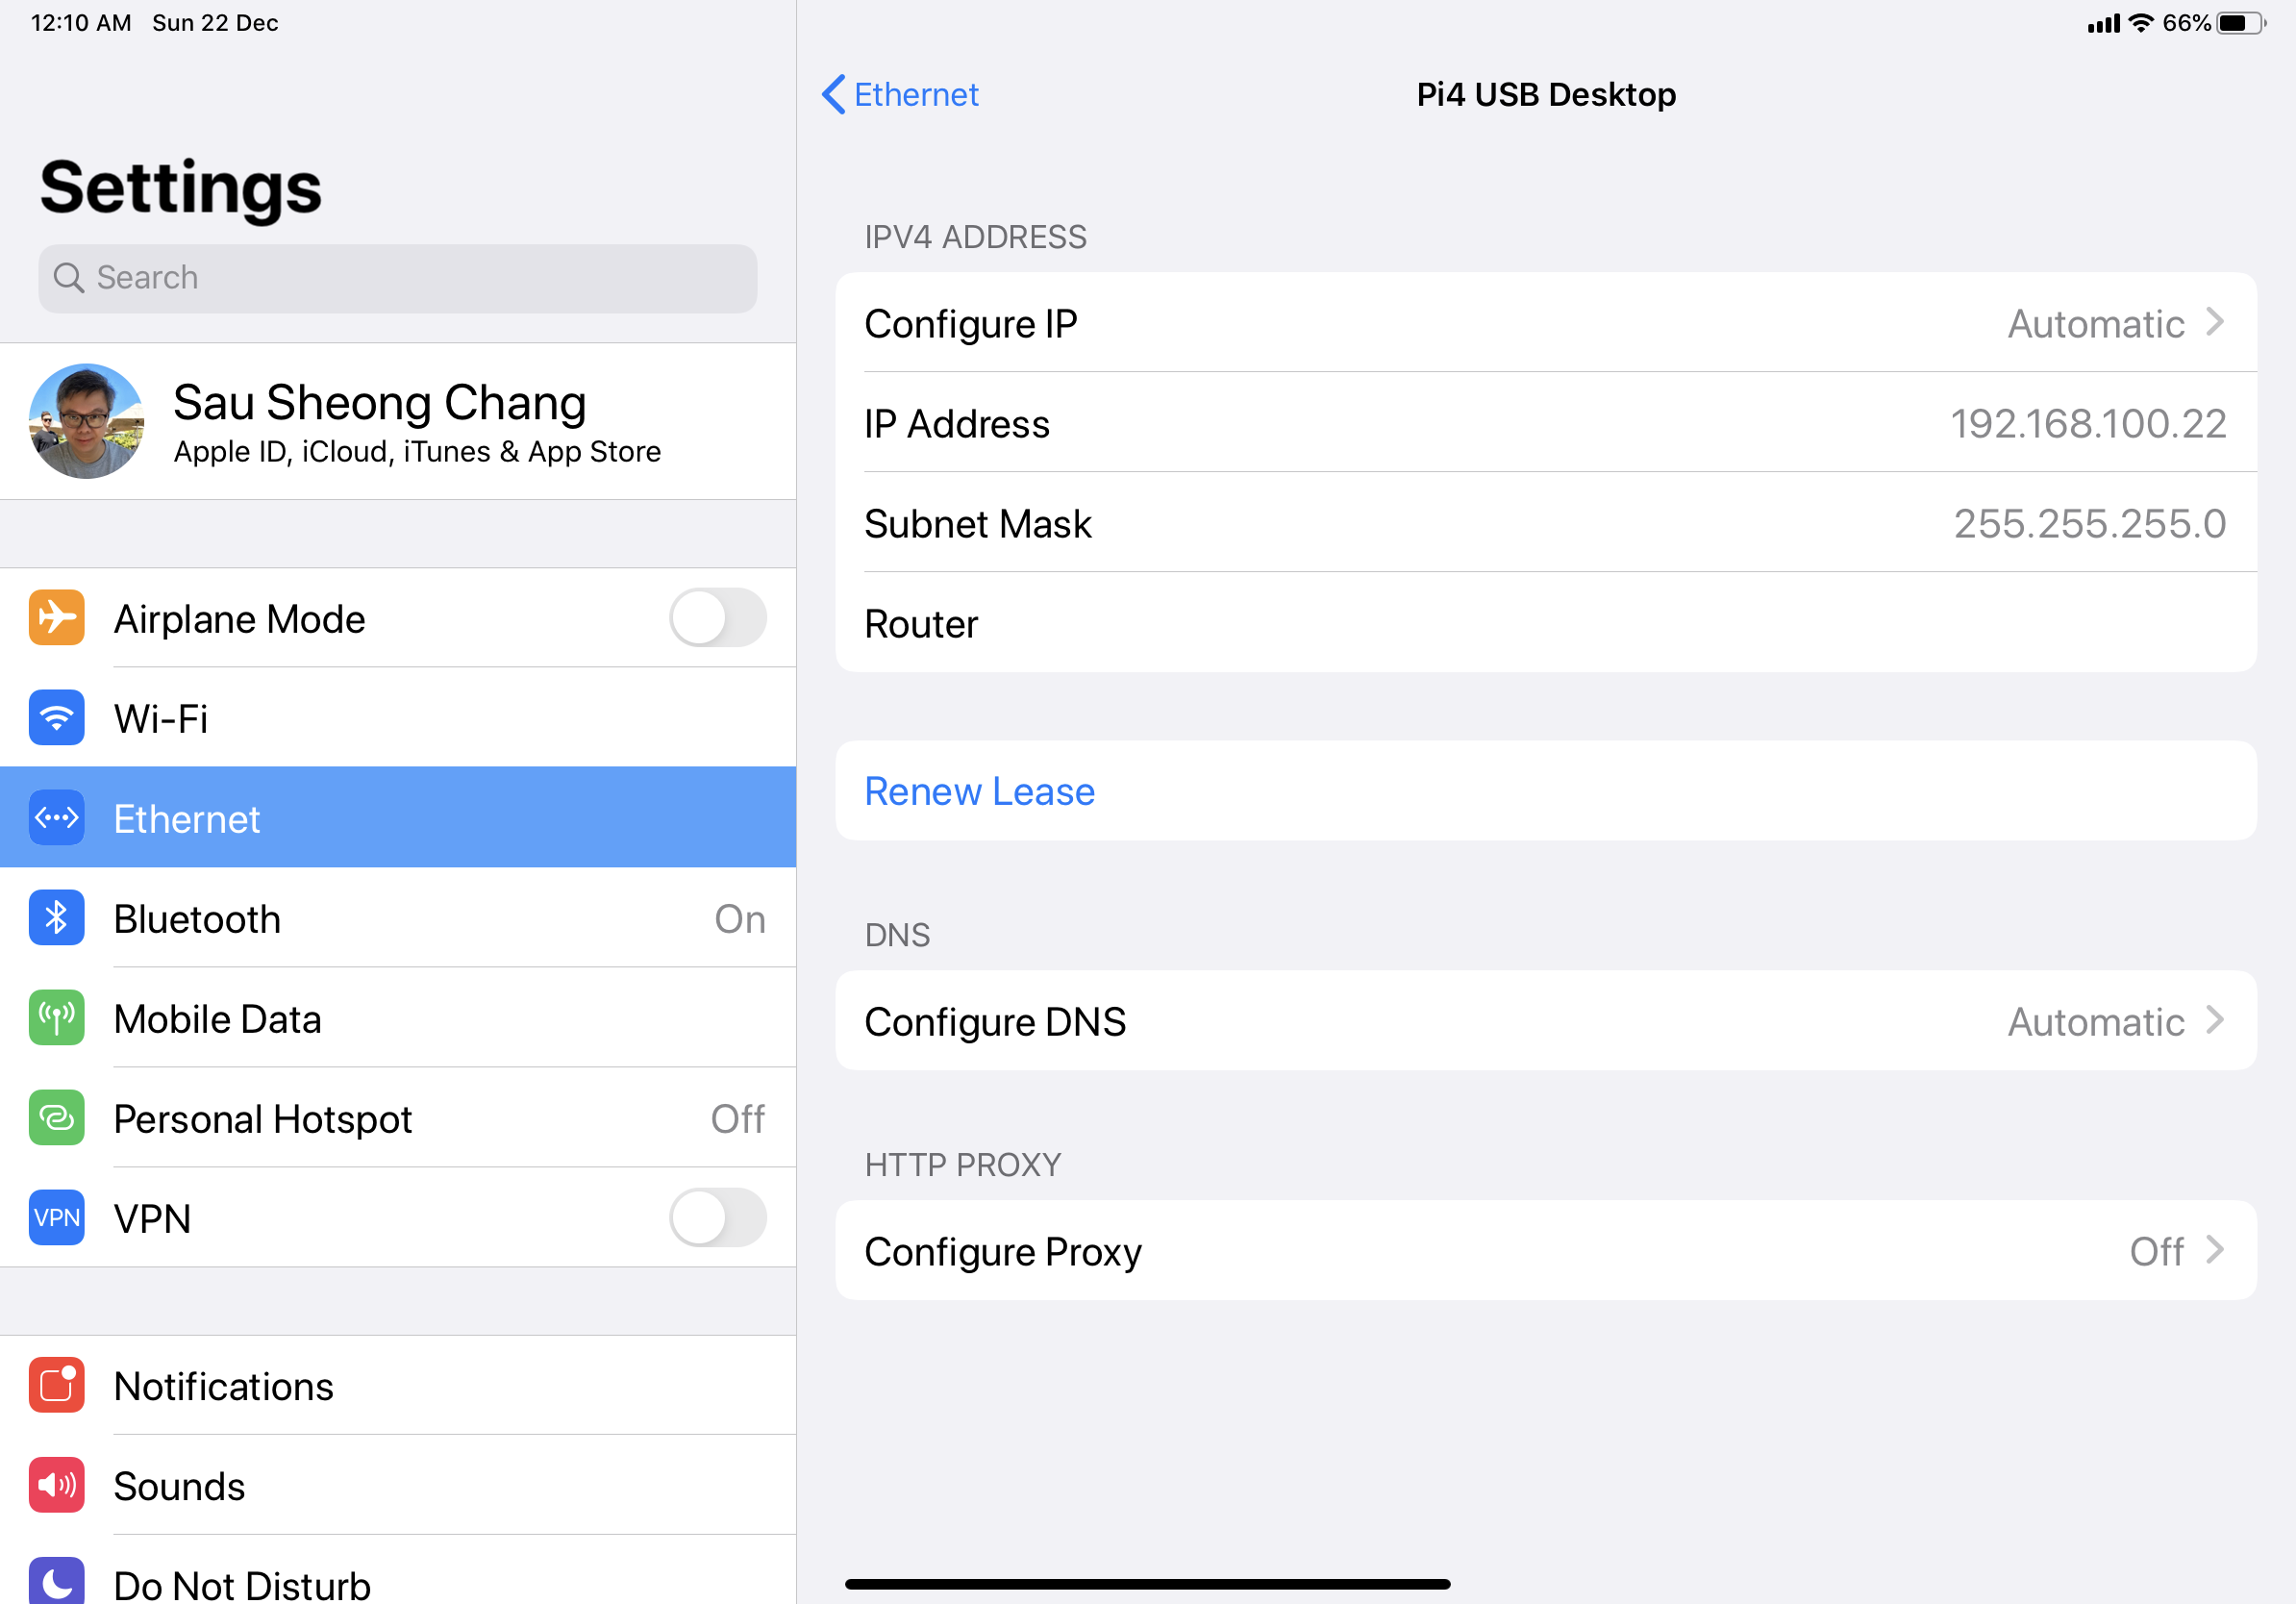 Network configuration for the Pi4 interface
If you see all these your Pi4 is set up and connected!
Now that you have a development machine
So you have the Pi4 set up as a development machine and you’ve connected your iPad Pro to it. What’s next is to get the right tools on your iPad Pro to start developing. There are plenty of apps on iPadOS to choose from, but here are the ones I use.
SSH
There are plenty of SSH clients available on the iPad but the two apps I’ve tried and eventually still keep are Termius and Prompt. Both are professionally written and beautiful apps that has plenty of good features.
I preferred Termius because it allowed me to have access to the full screen and Prompt had this big top menu bar that annoyed me quite a bit. However over time what turned me off from Termius was not only its subscription model (I actually subscribed for a year) but that it increased the subscription price from about $10 a year to $10 a month. In addition, it gets disconnected from whichever server I connect to whenever I switch out and that was not usable (to be fair, its a drawback because of iOS and Termius later fixed it).
In the mean time, I discovered a different category of apps that proved to be a good replacement for SSH client apps – terminal emulators.
Terminal emulators
There are a few terminal emulators as well though not as many as SSH clients and most of them tend to be open source or free. One advantage terminal emulators have over SSH clients is that you can actually work off it directly from iPadOS! Depending on the sophistication of the emulator, it can go quite far including compiling and running applications on it.
My favourite terminal emulator by far is this pretty cool open source project called iSH, which is essentially a Linux shell environment running locally on iOS/iPadOS using a usermode x86 emulator. It’s based off Alpine Linux and you can install stuff like Python3, Ruby and even Java! However because it is an emulator there are limitations, for eg Ruby runs pretty poorly on it and there are gems that often simply doesn’t work on it. Jupyter Notebook runs on it as well (takes a long time to install) but runs really slowly (it is an emulator after all).
Also, Go and Rust doesn’t work on it either because it requires MMX instruction set emulation which it doesn’t support. It’s not a released project as of date but you can either download, compile and deploy it on your own, or sign up for a TestFlight beta trial.
Another terminal emulator I like is LibTerm, an open source project that offers a terminal experience and a number of pre-installed packages. LibTerm has Python 3.7 and Lua 5.3 pre-installed and you can even compile C! You can add other packages through the file system, which is generally whatever the Files app allows you to access.
File-sharing
Files is one of most useful apps in iPad Pro and I use it all the time to connect to my files in various cloud services as well as on the iPad Pro itself. You can also connect Files to the Pi4 through a Samba server.
Samba is an open source re-implementation of the SMB (Server Message Block) networking protocol and provides file and print services on Linux systems. For our purposes, Samba allows us to connect the Files app on the iPad Pro to directories on the Pi4. Let’s see how to do this.
First you need to install the Samba server on the Pi4.
- Install Samba through the command line.
sudo apt install samba samba-common-bin
[sausheong]
path = /home/sausheong
writeable=Yes
create mask=0777
directory mask=0777
public=no
This essentially creates a shared folder in my home directory. By default Samba is set up as a standalone server, which is what we want.
sudo smbpasswd -a sausheong
sudo systemctl restart smbd
Your Samba server is installed and set up. To make it accessible via the Files app, do the following:
- Open the Files app and select the
…and choose to connect to a server. - You will be asked to set the server, just put in the IP address (in my case, that would be 192.168.100.1) and select
Next - Enter the user name and password and select
Next.
That’s it! You should see the server appearing under the Shared heading. When you select the server you will see the files in the /home/sausheong directory in the Pi4.
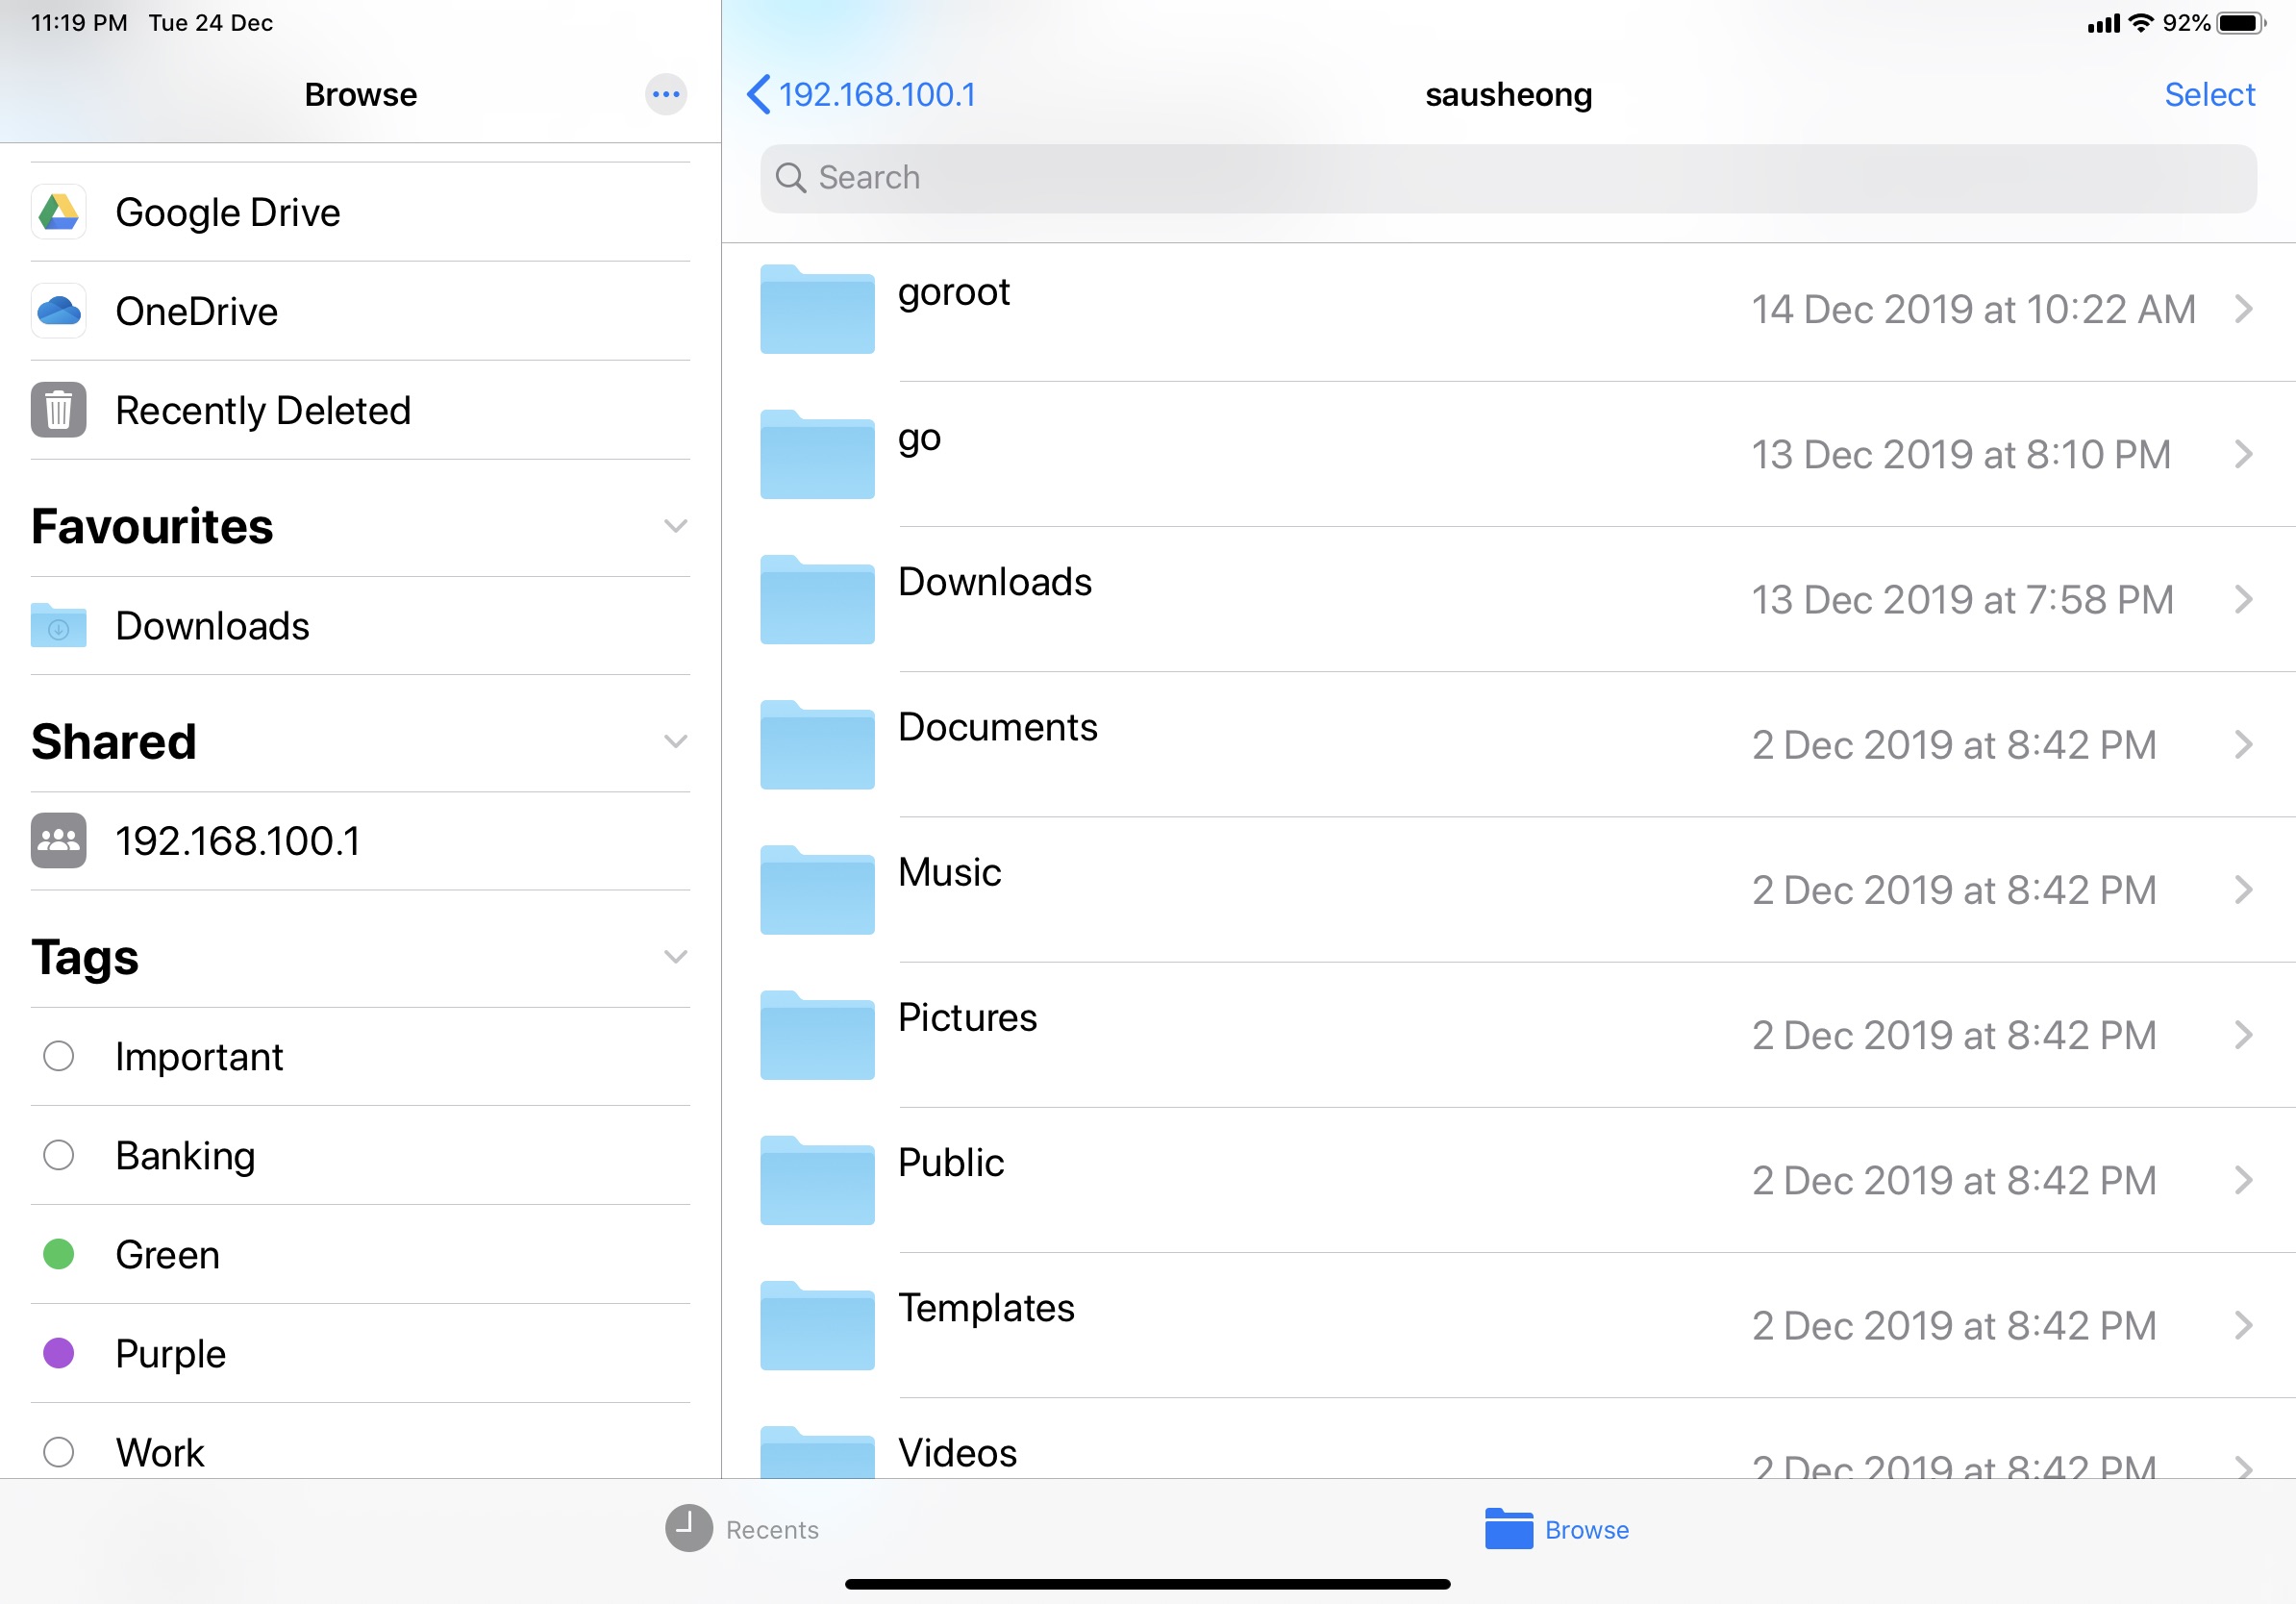 Seeing your Pi4 files from the File app
Code editors
I don’t use code editors on my iPad Pro because none of the ones I’ve used fit into my normal coding workflow. Specifically when I write code or make changes to code, I expect the changes to be saved. Unfortunately most of the code editors I have tried before requires a secondary step of syncing the files to the server, which really breaks my flow.
There are a couple of exceptions, especially Kodex, which allows me to use the Files app to connect to a Samba server on the Pi4 and it works reasonably well. However I don’t like the interface (yes, I’m picky) so that was it. Having said that though, I haven’t tried the more popular code editors yet like Coda or Buffer essentially because I’m not confident that they will be worth it.
Remote desktop
With the Pi4 as a separate development machine you might also ask, why not make it a remote desktop altogether? By this, I mean using VNC (Virtual Network Computing). And of course, there’s really nothing stopping you from doing it.
For those not initiated, VNC is a graphical remote desktop system that uses the Remote Frame Buffer protocol (RFB) to remotely control another computer. It sends the keyboard and mouse events from one computer to another, and receives screen updates back over a network.
Raspbian has built-in VNC Connect from RealVNC, which includes both the VNC Server and client. We’re going to use the VNC client from the iPad Pro so we just need to enable the server on the Pi4.
Run the raspi-config tool configure the Pi4 from the command line:
sudo raspi-config
Go to Interfacing Options, scroll down and select VNC > Yes and we’re all set!
On the iPad, you need to install a VNC client. There are few but I used VNC Viewer from RealVNC to be consistent. Add a new server and enter the IP address (192.168.100.1 in my case) and name. The user name and password is the same user name and password you used to log into the Pi4 (it’s either pi or whichever user you created). That’s all there is to do, just hook up your iPad to the Pi4 and away you go!
 Remoting to your Pi4
Finally if you’re wondering even though you’re remote-ing into the Pi4, can you add a mouse to the Pi4 instead of using the rather clumsy touch interface or the rather silly remote mouse? And why not. It would be impossible if your remote desktop is really far away but this is just a small box next to your iPad, so just stick a mouse into one of the USB ports! It works pretty well.
And since you’re adding a wired mouse, why not a wireless one, heck, why not a Bluetooth mouse. That works like a charm too!
Visual Studio Code
I mentioned earlier that I don’t use code editor apps on my iPad Pro. My usual code editor is Visual Studio Code on my MacBook Pro, and unfortunately it doesn’t work on the iPadOS. However it does work on the Pi4 though it’s a bit messier to install.
VSCode is not a package not in the standard repositories. In addition, while you can download the .deb package from the VSCode site, they only have it in amd64. Remember, our nifty little Pi4 is an ARM machine so this wouldn’t work. Fortunately the Internet is full of helpful people and one such person have made all the necessary scripts to perform an easy install of VSCode.
Just follow these steps on the Pi4:
- Execute this command to set things up:
curl -s https://packagecloud.io/install/repositories/headmelted/codebuilds/script.deb.sh | sudo bash
You should have a working version of VSCode after this. Just go to any directory in command line and do this to open up VSCode.
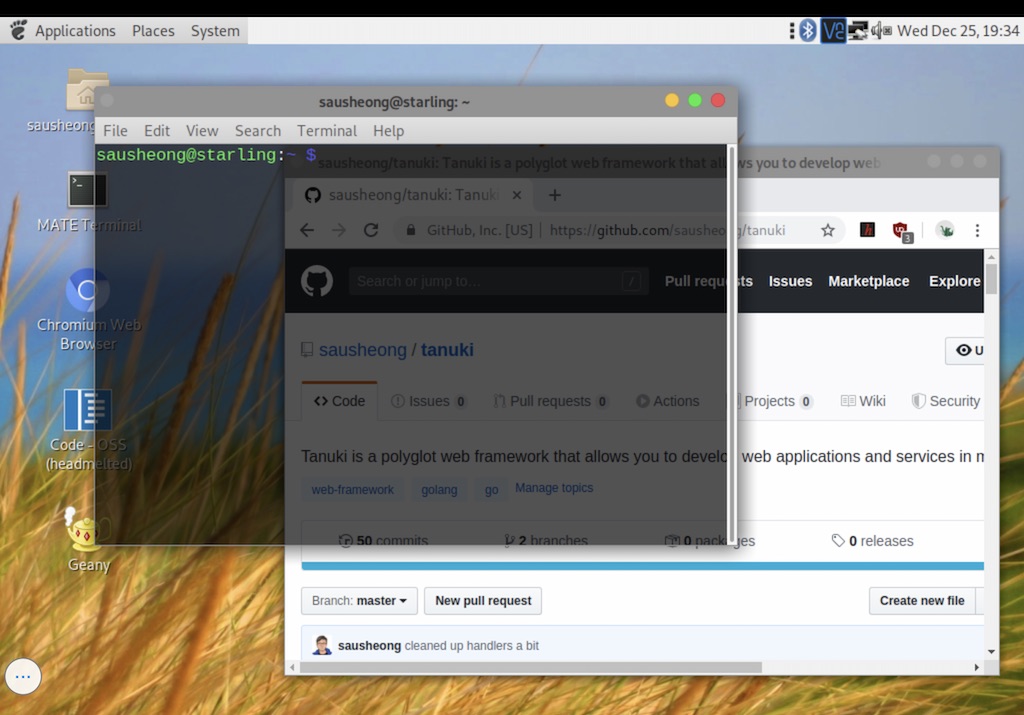
code-oss .
Here’s how I used VSCode on the Pi4 for my Tanuki project.
Jupyter Notebook
If you’re into data science, you’ll be happy to note that Jupyter Notebook works pretty well on the Pi4. Of course if you really prefer the iPad Pro interface, you can also use one of my favourite apps — Juno Connect. Juno Connect literally helps you to connect from your iPad Pro to a remote Jupyter Notebook server, mostly on the cloud.
To install Jupyter Notebook, do this at the command line on your Pi4:
sudo pip3 install jupyter
Note that this is using pip3 , Python 3’s package manager.
To start the Jupyter Notebook server on the Pi4, do this:
jupyter notebook —no-browser
We’re not starting up with the browser because we want to use Juno Connect.
To connect to the server from the Juno Connect app:
- Select Add Jupyter Server in the Juno Connect app
- For Connection Settings choose Local port forwarding and not Direct connection. Using direct connection requires you to set up the Jupyter Notebook server with security certificates and such and is more complicated.
- Enter the IP address of your Pi4 (in my case it’s 192.168.100.1) for the host and the port should be 22
- For Authentication Settings, you can choose Password which is easier to set up, and fill up the rest of your credentials
- Finally for the Port Forwarding Settings you should have
localhostand8888as these are the defaults
Your SSH tunnel should be set up and you’re ready to go!
 Connecting to the Jupyter Notebook on the Pi4 from Juno Connect
Recently they released Juno, which brings the Jupyter Notebook server directly on the iPad itself. It’s a wonderful app but with the Pi4 you can install the full Jupyter Notebook on the Pi4, with any library you want and is able to on it and use Juno Connect to connect to it.
What’s really nice is that Jupyter Notebook supports many different programming languages too! It does this through different ‘kernels’, including Ruby and Go. Jupyter Notebook is a quick and easy way to run calculations and simulations.
Gotchas
The Pi4 is a great improvement from before but it’s far from perfect. Some things you should be aware of when you’re using the Pi4 for development:
-
It’s not very powerful. Remember this is a lot less powerful than your laptop or desktop. The Pi4 has a max of 4GB of RAM and the OS itself runs of an SD card. The performance will not be the same as your programming laptop or desktop.
-
It’s an ARM machine. For some packages that aren’t compiled for the ARM you will need to compile them from source or find someone else who has done it.
-
The Pi4 drains power from the iPad Pro. If you run intensive jobs especially with the GUI running, you’ll run out of juice pretty quickly. Even if you’re not, just leaving it running means it will continue drawing power from the iPad Pro. There’s a workaround though. If you have a USB-C adapter with pass through USC-C power, you can power the iPad Pro even as it powers the Pi4!
 Using the Apple USB-C connector to charge the iPad Pro and access the Pi4 at the same time
 -
VNC from the iPad Pro is usable but can be a bit laggy. This is compared with hooking up the Pi4 with my MacBook Pro. I haven’t figured a way to make it perform better. If you’re comfortable coding from the terminal using vi or emacs, you should use it instead because it’s faster.
-
The 11" iPad Pro screen isn’t designed for a desktop experience when running VNC. I haven’t tried it with a 12.9" iPad Pro but running a desktop interface on the 11" can be a bit small.
-
The Pi4 can run pretty hot. I used passive cooling with heat sinks and I tried a small in-case fan and it helps quite a bit but with the fan it can be a bit noisy (depends on your fan). There are probably more things you can do to reduce the heat but I haven’t tried them.
-
Not all USB-C cables work with the Pi4. This is a known issue. Surprisingly it’s the cheaper cables that mostly work because e-marked USB-C cables can detect what it’s connected to and because of a particular way the Pi4 was designed, it is detected as an audio adapter accessory and won’t power it.
Happy coding!
I have just scratched the surface on what you can do with this. The Pi4 4GB might not be the most powerful development machine and it runs on ARM, but it’s compact, extensible, has 4 USB ports, with built-in wifi and Bluetooth BLE. In addition everything is on a microSD card and you can easily swap out another with the environment you want.
 Another iPad Pro and Pi4 configuration
So just pop one into your bag, with a few microSDs of the different environments and you can literally bring your all development machines everywhere you go!
Credits
I had plenty of help from these sites when trying to put things together for the Pi4 as well as writing up this post.
- Pi4 USB-C Gadget – Ben’s Place
- My Favourite iPad Pro Accessory: The Raspberry Pi 4 - YouTube
- Dnsmasq - network services for small networks.
- Modern USB gadget on Linux & how to integrate it with systemd (Part 1)
- Defined Class Codes | USB-IF
- USB Interface Association Descriptor Device Class Code and Use Model
- Understanding USB in Linux
- USB Gadgets and ConfigFS
- The USB composite framework LWN.net